

Unleashing the Power of Azure Storage: A Beginner's Guide to Hosting Static Websites on Azure Cloud


Table of contents
- Intro
- 📃Prerequisites
- 🎯Architectural Diagram
- ✅ Task 1: Downloading a static template to use and create a GitHub repository to host files remotely online
- ✅ Task 2: Create a Resource group, Storage account and enable Static website hosting for the storage account
- ✅ Task 3: Creating an ARM (Azure resource manager) service Connection between your Azure Subscription and Azure DevOps Account
- ✅ Task 4: Configure azure-pipeline.yml file to create build Artifacts and setup Continuous Integration
- ✅ Task 5: Creating a Self-hosted agent pool to have a functional pipeline in Azure DevOps
- ✅ Task 6: Creating a release pipeline/continuous deployment to automate the deployment of the build Artifact to the storage account
- ✅ Task 7: Setting up Azure CDN and mapping a custom domain to your CDN endpoint
- ✅ Task 8: Cleaning up resources
- ♾️ Conclusion
Intro
Hosting a static website and automating its deployment can seem daunting for beginners. However, with Azure Storage Account and Azure DevOps, it becomes a straightforward process.
Hey, fam, My name is Joel Oduyemi, and I'm a passionate DevOps practitioner embarking on a continuous learning journey in the world of technology. I'm currently undergoing a #10WeeksOfCloudOps challenge organized by Piyush Sachdeva, and this Azure DevOps journey has been an integral part of my learning experience. It has pushed me to explore the vast possibilities of cloud operations and expand my expertise in the Azure ecosystem. 🌟
In this beginner-friendly blog post, I will be walking you through the steps it took me to host a static website on an Azure Storage Account and automate the continuous integration and deployment (CI/CD) using Azure DevOps.
📃Prerequisites
Azure Account and Subscription
Azure DevOps Account: Sign up for a free account on Azure DevOps (dev.azure.com)
GitHub Account and Basic Knowledge of Git
Static Website Template
A domain name or Sub-Domain (Optional)
Resilient Attitude to learn and build on Azure Cloud 😎
🎯Architectural Diagram
Let's get started on this exciting journey!
✅ Task 1: Downloading a static template to use and create a GitHub repository to host files remotely online
To begin, download a static website template from an online source or clone the repository available at github.com/Joelayo/Week-1_Azure_CloudOps. If you choose to use the provided repository, fork and clone it to your local PC. If using your own template, create a new GitHub repository and clone it to your local PC.
git clone https://<PAT>@github.com/<username>/<repo-name>.git
Replace <PAT> with your Personal Access Token (PAT) generated at github.com/settings/tokens. Also, replace <username> with your GitHub username and <repo-name> with the name of your repository.
Once cloned, copy the content of the static website template to the cloned repository directory. Then, stage the changes, commit them, and push the changes to your GitHub repository.
git add .
git commit -m "my first commit"
git push
✅ Task 2: Create a Resource group, Storage account and enable Static website hosting for the storage account
- Navigate to your Azure dashboard, and create a new Resource Group (RG) for your project with a unique name like "
azurestatic_web01-rg" Choose a region, and then review and create the RG.


- Next, go to your Azure dashboard and create a Storage account. In the Create window, select the resource group you created earlier and choose a unique name for the account (e.g., azurestaticstorage). Review the settings and click Create. You can leave the other fields as default.

After creating your storage account, the next step is to enable static website hosting. To do this, you need to locate your storage account and select it to display the account's Overview pane.
In the Overview pane, navigate to the Capabilities tab, and then select Static Website. This will display the configuration page for the static website.

Select "Enabled" to enable static website hosting for the storage account. In the "Index document name" field, specify a default index page (e.g.,
index.html). The default index page will be displayed when a user navigates to the root of your static website.In the "Error document path" field, specify a default error page. For example, you can use "
404.html" or "index.html" if you don't have a dedicated 404 page. The default error page will be displayed when a user tries to access a page that does not exist on your static website. After specifying the error page, click Save to complete the static website configuration.

✅ Task 3: Creating an ARM (Azure resource manager) service Connection between your Azure Subscription and Azure DevOps Account
- Before creating an ARM service connection between your Azure subscription and Azure DevOps account, ensure that you have created a new project in your Azure DevOps account.

- After creating your project, navigate to the project settings. Within the settings, under the pipelines tab, select "Service Connection" and then choose "Create service connection" followed by "Azure Resource Manager." Following the steps, you will be prompted to authenticate a service principal either automatically or manually. In my case, I had to perform the authentication manually as my DevOps account couldn't automatically detect my Azure subscription.

- If you will be creating the service connection manually as I did you can follow along with this video by Rahul Nath on youtube below which explains perfectly how to go about it, watch the video here
✅ Task 4: Configure azure-pipeline.yml file to create build Artifacts and setup Continuous Integration
If you have already forked and cloned my repository at the beginning, you can skip this step. However, if you prefer to learn and set up continuous integration on your own, you will need to create an
azure-pipelines.ymlfile in your codebase.Inside your project's root directory, create a file named
azure-pipelines.ymland copy the code below into the file. Pay attention to the following line:pool: MyPc_Agent(I'll explain its significance in the next task)
# HTML
# Archive your static HTML project and save it with the build record.
# Add steps that build, run tests, deploy, and more:
# https://aka.ms/yaml

trigger:
- main

pool: MyPc_Agent

steps:
- task: ArchiveFiles@2
  inputs:
    rootFolderOrFile: '$(build.sourcesDirectory)'
    includeRootFolder: false
- task: PublishBuildArtifacts@1
- After creating the file, push the new changes to your GitHub repository. Then, navigate back to your DevOps project and proceed with the steps illustrated in the image below:

- Following the image above, locate the
azure-pipeline.ymlfile you pushed earlier to your repository. Review the changes made to the CI pipeline. Once set up, any new code pushed to your GitHub repository will automatically trigger the pipeline to run and create a build artifact. This artifact can be deployed to your storage account at a later stage.
✅ Task 5: Creating a Self-hosted agent pool to have a functional pipeline in Azure DevOps
Depending on your subscription, you may not need to perform this step if you can utilize the cloud agent provided by Azure. However, in my own case, the cloud agent didn't work, got a parallelism error, so I had to create a self-hosted agent named
MyPc_Agent.Using a self-hosted agent provides you with greater control to install the necessary software dependencies for your builds and deployments. Some of the essential software dependencies required for your release pipelines include:
To create your new self-hosted agent, I highly recommend this video guide here
✅ Task 6: Creating a release pipeline/continuous deployment to automate the deployment of the build Artifact to the storage account
- Configuring continuous deployment is just as important as the other tasks you have completed so far. To create a release pipeline, navigate to "Pipelines" and then click on "Releases". From there, click on "New pipeline".

- In the next screen, select the "Empty job" template and provide a meaningful name for your pipeline, such as "Deployment to Azure Storage Account".

- Now, select "Add artifact" and choose the source type as "Build." Then, select the Build Pipeline you previously created for continuous integration as the source. Set the Default version to "Latest" from the default branch.

- To enable continuous deployment on your release pipeline, follow the steps shown in the image below to enable the trigger for continuous deployment.

- Next, In the stage view, select "View stage tasks," and then configure the Agent Job to use the self-hosted agent you created earlier (you can skip this step if you are using the cloud agent provided by Azure).

- After configuring the Agent Job, navigate to the newly added stage and click on the "+" button to add a task. Create your first task by adding "Extract Files" to the task list. Configure the task to extract the build artifact and save it to a new directory named "unzip." You can refer to the image below for guidance, and leave the remaining settings as default.

- Finally, add another task by searching for the "Azure File Copy" task. Add this task to the stage and then configure it to connect to your Azure subscription. Select the appropriate storage account and specify the source and destination paths for the artifact to be copied.

- The source path for the Azure File Copy task will be the content of the previous step stored in the unzip directory. When specifying the unzip directory as the source, ensure to include a wildcard (*) to select all the files within the directory.
Example: $(System.DefaultWorkingDirectory)/_Joelayo.Week-1_Azure_CloudOps/drop/unzip/*
By including the wildcard (*) after the path to the unzip directory, you ensure that all files within the directory are selected for copying.
The image below shows what is expected to be filled in the required fields:

- After configuring Azure File Copy, it's finally time to save your release pipeline and initiate the deployment process by creating a new release.

- After initiating a release, you will receive notifications indicating the status of each task in your pipeline, as shown in the image below:

✅ Task 7: Setting up Azure CDN and mapping a custom domain to your CDN endpoint
- In the Azure portal, navigate to your storage account and open the account overview, then select Azure CDN under the Security + Networking menu to access the Azure CDN page.

- In the CDN profile section, you have the option to either create a new CDN profile or use an existing one. A CDN profile is a grouping of CDN endpoints that have the same pricing tier and provider. Provide a unique name for the CDN profile and select a pricing tier for the CDN endpoint.

- Next, in the "CDN endpoint name" field, specify a unique name for your CDN endpoint. This name should be distinct across Azure and will form the first part of the endpoint URL. Then, in the "Origin hostname" field, provide the endpoint URL for your static website.
The image below shows an example endpoint configuration:

Select "Create" and patiently wait for the CDN to provision. Once the endpoint is successfully created, it will appear in the endpoint list. If there are any errors in the form, you will notice an exclamation mark next to the respective field.
Once the CDN endpoint is provisioned, you can easily access your static website by navigating to the CDN endpoint, which will display the contents of the
index.htmlfile that you previously uploaded.

- To map the CDN endpoint to a custom domain, you first need to create a Canonical Name (CNAME) record with your DNS provider. This CNAME record should point to your CDN endpoint.

To create a CNAME record with the "
azurestatic" subdomain, sign in to the website of your DNS provider for the custom domain. Follow these steps to create a CNAME record entry for your custom domain:Locate the DNS settings or management section in your DNS provider's website.
Look for the option to create a new DNS record and choose CNAME.
Complete the fields according to the image provided above, making sure to enter the required information (field names may vary).
Save the changes and then proceed to add the custom domain to your CDN endpoint.
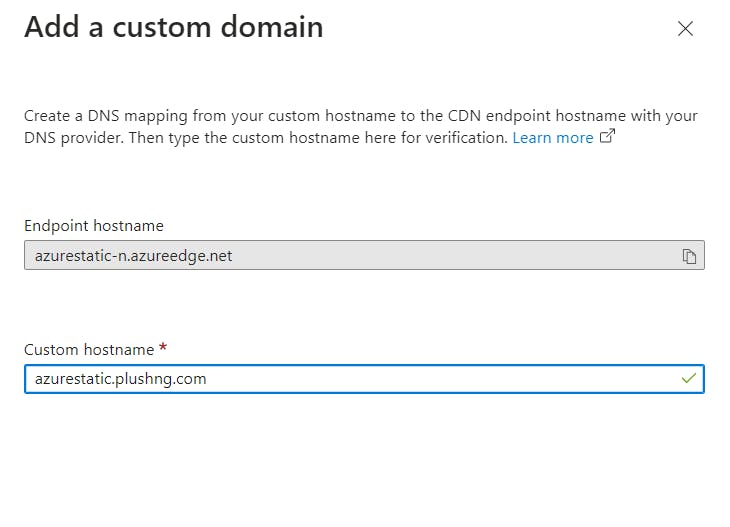
On the CDN profile page, select the specific CDN endpoint where you want to add the custom domain.


In the "Add a custom domain" section, the "Endpoint hostname" field is automatically generated and pre-filled with your CDN endpoint URL:
<endpoint-hostname>.azureedge.net. Please note that you are unable to modify this value.For Custom hostname, enter your custom domain, including the subdomain, to use as the source domain of your CNAME record.
✅ Task 8: Cleaning up resources
Delete the release pipeline
In the Azure DevOps project, navigate to "Pipelines" > "Releases."
Locate the release pipeline created for continuous deployment and delete it.
Delete the Azure CDN profile and endpoint
In the Azure portal, go to your project's resource group.
Locate the Azure CDN profile and click on it.
In the CDN profile overview page, navigate to the "Endpoints" tab.
Select the CDN endpoint and click on "Delete" to delete it.
Confirm the deletion.
Delete the Azure Storage Account
In the Azure portal, go to your project's resource group.
Locate the Azure Storage Account used to host your static website.
Click on the Storage Account and navigate to the "Overview" section.
Click on "Delete" to delete the Storage Account.
Confirm the deletion.
Delete the custom domain DNS records (if applicable)
Go to your domain registrar or DNS provider's website.
Remove the CNAME or ALIAS/ANAME records that were added to map the custom domain to the CDN endpoint hostname.
Save the DNS record changes.
Verify resource Deletion
Wait for a few minutes to allow the resource deletions to propagate.
Check the Azure portal and ensure that the Azure CDN profile, endpoint, Storage Account, and any other related resources are no longer present in the resource group then delete the resource group.
♾️ Conclusion
Hosting a static website on Azure Storage Account and automating the CI/CD process with Azure DevOps empowers you to efficiently manage and deploy your web content. By following this step-by-step guide, you have learned how to download a static template, create a GitHub repository, set up an Azure Storage Account, configure CI/CD pipelines with Azure DevOps, create a self-hosted agent pool, and automate the deployment of your build artifacts to the storage account. Additionally, you have explored setting up Azure CDN and mapping a custom domain to provide a scalable and performant web experience. Remember to clean up your resources to avoid unnecessary costs. With this newfound knowledge, you are well-equipped to leverage the power of Azure and Azure DevOps to host and deploy static websites with ease. Happy hosting and coding!
Connect with me on:
🔗 Linkedin - https://www.linkedin.com/in/joel-oduyemi
🔗 Github - https://github.com/Joelayo